A step by step tutorial on how to make a homemade pie crust that is buttery and flaky. Learn How To Make Homemade Pie Crust from scratch!
It's important to remember is that pie crust does not need to be perfect! It's job is functional - To hold its contents in place as it bakes and to taste good. It may take a little practice, but I promise that you can master pie crust. Keep reading to learn How To Make Homemade Pie Crust!

It's official - Pie making season is here! And I couldn't be happier about it. To be honest, I am not a baker by nature. I enjoy baking and really enjoy eating things that are baked, but I'm more of a 'throw everything in the pot and see how it comes out' type of cook.
Baking requires much more precision than that. It demands a specific list of ingredients that need to be measured and added in a certain order and finished within an allotted time frame.
Pies are a little more forgiving than the average baked good. There is a certain amount of 'throw everything together and see how it comes out' with pies, which is probably why they are my favorite thing to bake.
The key to any pie is the crust. It's kind of the foundation. Once you master the crust, you can play around with all types of fillings. I think people are sometimes intimidated by the idea of making pie crust and they shouldn't be.
Jump to:

How To Make Homemade Pie Crust
Pie crust only contains a few ingredients. They include flour, butter, salt, water, and vinegar.
- Start out with 3 cups of AP flour, 2 sticks of cold unsalted butter, and a pinch of kosher salt. The temperature of the butter is going to play a huge role in the success of your pie crust.
- Place the flour, butter, and salt in a sturdy bowl and grab a pastry cutter. Take the pastry cutter and start to 'smash' the butter into the flour. The butter should begin to break apart and incorporate into the flour. Do this for 3-5 minutes. Your wrist may get a little sore, but it's totally worth it.

Add The Liquids To The Pie Dough
After a few minutes, the flour and butter mixture will become a bowl full of coarse crumbs. It should have the texture of cornmeal. All of the butter has been incorporated into the flour.
The next step is the trickiest part (I think) of making pie crust. This includes adding the liquids and forming the whole thing into ball.
- Add 4-6 Tbsp. of cold water (very important that it's cold) one at a time. Start with the first Tbsp. and begin to form the mixture into a ball with your hands. It will be crumbly at first. (Add more water if dough is just too crumbly).
- Continue to do this with the remaining 4-5 Tbsp. of cold water and 2 tsp. of vinegar (add one at a time and then continue to form a ball with your hands). The mixture should stick together in a ball after all the liquid has been added.
The mixture should resemble coarse crumbs after it is completely combined.

Chill The Dough In The Fridge
Split the ball of dough in two and flatten each one slightly. You should have two dough 'patties' at this point.
Wrap each portion of dough with plastic wrap and place in the refrigerator for 15 minutes. This will cool the dough off slightly so that it doesn't stick to your hands as you roll it out.

How To Roll Out Pie Crust
- After the dough has chilled for 15 minutes, retrieve one or both (depending on how much you need) portions from the fridge and remove the plastic wrap. This is the fun (and messy) part.
- Place the dough on a clean and even surface. Coat the surface, the dough, and a rolling pin with flour. It is important that there is flour under the dough so that it doesn't stick to the surface.
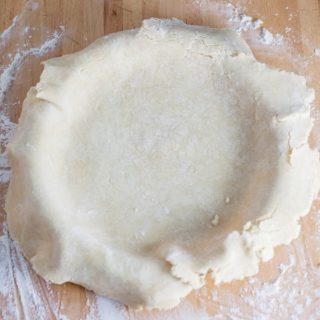
- Begin to roll the dough out with a rolling pin. Start with short, light stokes and as the dough stretches you can press down harder to flatten it. Flip the dough over once or twice to make sure it doesn't stick and sprinkle with more flour if needed.

The sides may crack a little bit and you might get little tears in the crust. That's OK! Just pinch any cracks or tears together with your fingers.
The most important thing is that it does not stick to the surface because it may rip apart as you remove it and place it in the pie pan.
If the dough rips apart for any reason, you can re-form it into a ball and try again!
Doing some holiday baking? Check out these recipes!
- Pumpkin Coffee Cake
- Cast Iron Skillet Apple Crisp
- Crustless Pumpkin Cheesecake
- Pumpkin Caramel Bread Pudding
- Gluten Free Apple Crisp
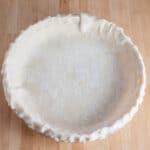
Place a pie pan or baking sheet near the dough. You don't want to carry pie dough across the kitchen - This would likely cause it to break.
Carefully slide the dough across the pan and press down so that it lines the surface. Again, the sides may crack or tear a little bit and that's OK. The goal is not perfection.
Looking for more desserts? Check out these recipes!
- Old Fashioned Blueberry Buckle
- Scandinavian Almond Cake
- Glazed Lemon Doughnuts
- Crispy Sugar Cookies
- Peanut Butter Blossoms
- Buttermilk Rhubarb Cake
- Cinnamon Sugar Apple Cake
- Italian Hazelnut Cake
- Baileys Doughnuts

Trim The Pie Crust
You can trim the edges from the pie crust to fit the pan if desired.
I like to sprinkle those pie crust scraps with cinnamon and sugar and bake them for a little 'pre-pie' treat. You can crimp the edges or press them down with a fork for that classic pie look.
This recipe makes two 9-inch pie crusts. You can roll out one or both of them depending on the type of pie you are baking.
If you become a pie crust master (and have a lot of patience) you can use the crust decoratively to make a lattice top or pie crust cutouts. I'm just in it for the most important part - Eating!
Love pies? Check out these recipes!
Are you gluten free? Check out this recipe for How To Make Gluten Free Pie Crust!
For a pizza crust from scratch check out How To Make Homemade Pizza Dough!
Looking For Homemade Pie Recipes? Don't Miss These!
Classic Blueberry Pie
Bourbon Buttermilk Pie
Southern Pecan Pie
Homemade Pie Crust (How To Make)
Ingredients
- 3 cups AP flour plus 2 Tbsp. for sprinkling
- 2 sticks unsalted butter cold
- pinch kosher salt
- 4-6 Tbsp. cold water
- 2 tsp. vinegar
Instructions
- Place 3 cups of AP flour, 2 sticks of cold unsalted butter, and a pinch of kosher salt in a large bowl. Begin to smash and cut the butter into the flour with a pastry cutter. Do this for 3-5 minutes until all of the butter has incorporated into the flour and the texture resembles cornmeal.
- Add 4-6 Tbsp. of cold water (one at a time) and 2 tsp. vinegar to the flour/butter mixture. After each addition of liquid, form the mixture into a ball. It will be crumbly at first, but should stick together after all liquid has been added. (Add a few more Tbsp. of water if dough is just too crumbly).The mixture should resemble coarse crumbs after combined.
- Split the ball of pie dough into two portions and flatten each of them slightly to form two dough patties.
- Wrap each portion of dough with plastic wrap and refrigerate for 15 minutes.
- Retrieve dough from fridge and remove plastic wrap.
- Place dough on a clean and even surface and sprinkle surface, pie dough, and rolling pin with flour.
- Begin to roll out dough lightly. As it flattens, press down harder with rolling pin. Check to make sure bottom is not sticking to surface.
- Once desired thickness is reached, carefully remove the pie crust and place onto pie pan or baking sheet.
- Remove excess dough and crimp edges if desired.
[email protected]
Could you please tell me the number of grams in 2 sticks of butter please? E.g. Is it 250 grams? Thank you.
Christine
It looks like two sticks of butter is 226 grams.
Kacey
I am making a banana cream pie so I need to know how to cook just the crust. Can you help me?
Christine
Hi Kacey - It sounds like you'll want to blind bake the crust. This just means baking the crust for awhile without the filling. It's really easy - just roll out the crust, place it in the pie pan, cover the dough with parchment paper or aluminum foil, and then fill the pie pan with something heavy like dry beans or rice. This will keep the pie dough from bubbling up as it bakes. Here is a great tutorial with step by step instructions. http://www.thekitchn.com/how-to-blind-bake-a-pie-crust-cooking-lessons-from-the-kitchn-197553
Hope that helps!
Çitra Kale-MyhomeDiaryinTurkey
İ am looking for another pie crust recipe...and İ found it here... lovely recipe and seems easy to follow...will try it soon. thx for sharing
Christine
Hope you enjoy!
Rachel
Can you use gluten free flour to bake apple pies and pie shells.
Christine
Hi Rachel - This pie crust should work great to make an apple pie. Just make sure to pre-bake as directed before adding the filling. Then bake as you would a regular apple pie. Hope that helps! 🙂
Alicia
I would just like to say that you should take the ad off the bottom of the page. I can't read your blog and it's too frustrating. So i probably won't be back.
Christine
Hi Alicia - Thank you for the feedback. I was able to change my ad settings so that users can now click the bottom bar ad off. The video ad that shows up at the bottom of the screen is also able to be clicked off. I hope that helps if you do decide to check out my site again!