
This gluten free Cookies and Cream Ice Cream recipe is made from scratch without an ice cream maker. An easy no churn dessert for summer!
It just so happens that July is National Ice Cream Month so I figured it the perfect time to whip up a batch of the good stuff. Last year it was peanut butter cup and this year it's No Churn Cookies and Cream Ice Cream.
The weather has been hot and humid here in Minnesota as of late and what better way to beat the heat than a big scoop (or two) of cold, creamy ice cream.
The great thing about No Churn Ice Cream (other than the fact that it's completely delicious) is that it's SO easy to make! This recipe is prepared without an ice cream maker and requires no fancy equipment. A couple of ingredients yields a batch of ice cream that rivals any store-bought variety.
I was introduced to this ice cream last summer and so glad I was because with very little effort we can have a batch of it sitting in the freezer tempting us with its creamy goodness.
My husband is especially excited because there are few things in life he enjoys more than ice cream.
Jump to:
Ingredients For Cookies and Cream Ice Cream
I always thought that making ice cream from scratch meant a bunch of complicated steps and expensive gadgets that I couldn't afford but this is simply not the case.
The base of No Churn Ice Cream involves two ingredients: Heavy whipping cream and sweetened condensed milk. Those two ingredients alone will provide you with a perfectly creamy and sweet treat.
Ice cream is something that is easily customized to our liking and everyone has their favorite flavors. I polled Facebook folks a few weeks ago and favorite ice cream flavors ranged from Butter Pecan to Blueberry Cheesecake to Pistachio.
Many of the answers involved some combination of vanilla and chocolate so to accommodate as many palettes as possible I settled on Cookies and Cream for this recipe.
Here's what you'll need to make it.
- 1 pint (or 16 oz.) Cold Heavy Whipping Cream
- 1 14 oz. can Sweetened Condensed Milk
- 1 package Gluten Free Chocolate Sandwich Cookies (can use Oreos if gluten isn't an issue for you)
- Pinch Kosher Salt
- 1 package Gluten Free Ice Cream Cones (can use regular ice cream cones if not gluten free) (optional)
How To Make No Churn Ice Cream
The first step is to whip the heavy whipping cream. This can be done using a Kitchen Aid Stand Mixer, an electric hand mixer, one of those old-school hand-cranked metal mixers, or by hand if you've got a lot of arm muscle and patience.
I like to use the Kitchen Aid stand mixer to complete this step simply because it's easy but any of these methods will work.
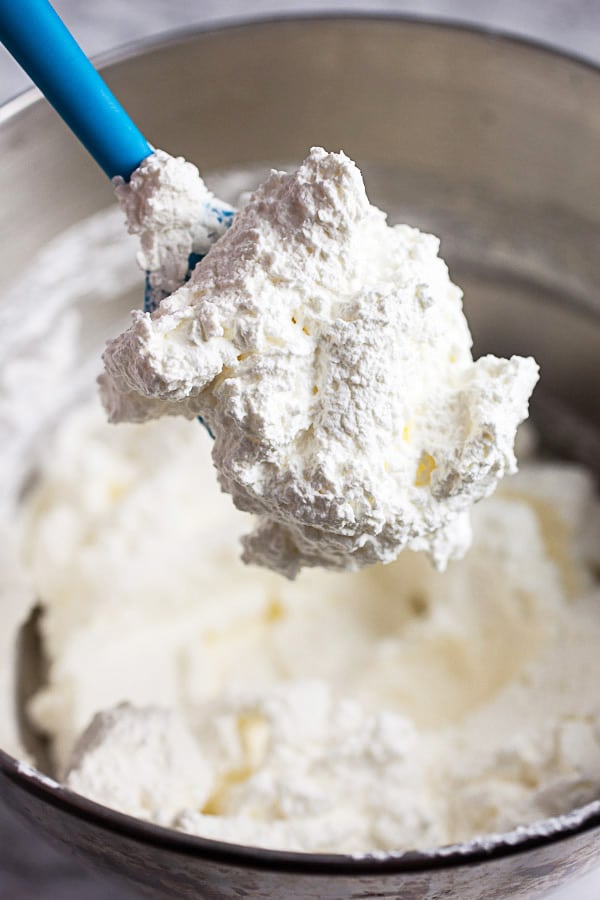
- Start by pouring 1 pint (16 oz.) of cold (important that it's cold) heavy whipping cream into a bowl. Mix the cream with your equipment of choice until it forms stiff peaks (Use the whisk attachment of a Kitchen Aid stand mixer). This usually takes 5-6 minutes on medium-high speed. (Make sure not to whip it too long or the cream will turn into butter).
- Pour 1 14 oz. can of sweetened condensed milk into a large bowl.
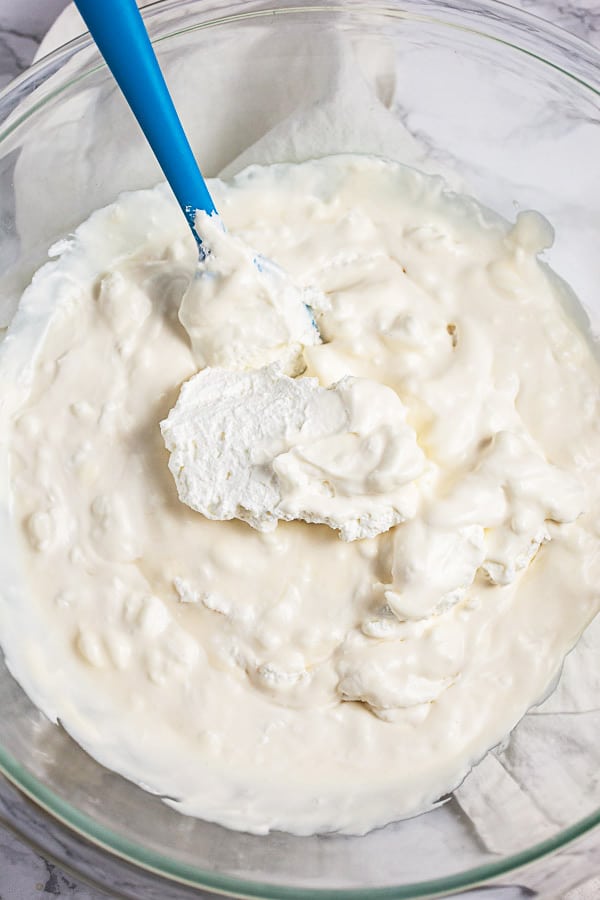
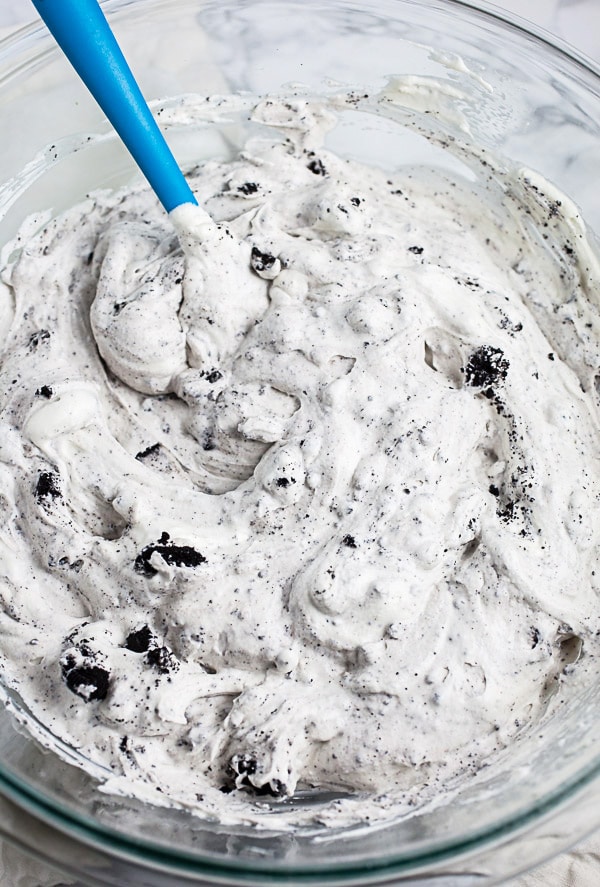
- Once the heavy whipping cream is whipped add 1 scoop at a time to the sweetened condensed milk and gently fold it in using a spatula. It's important to add it a bit at a time and not to mix it too vigorously - The whipped cream will keep the mixture light and airy and over-mixing it will take all the air out of it.
What Are The Best Cookies To Use?
Cookies and Cream Ice Cream is made with some variety of chocolate sandwich cookie. It's usually prepared with Oreo cookies as they are the most popular brand out there.
You can use regular Oreos if gluten is not an issue for you or Gluten Free Oreos if you'd like to keep it gluten free.
My favorite brand of gluten free chocolate sandwich cookies are these Kinnitoos from Kinnikinnick. You could also go for the Chocolate Vanilla Cream cookies from Glutino, the Chocolate Sandwich Cookies from Mi-Del, or the Chocolate Cream Cookies from Goodie Girl.
ANY of these choices are delicious because, you know, cookies.
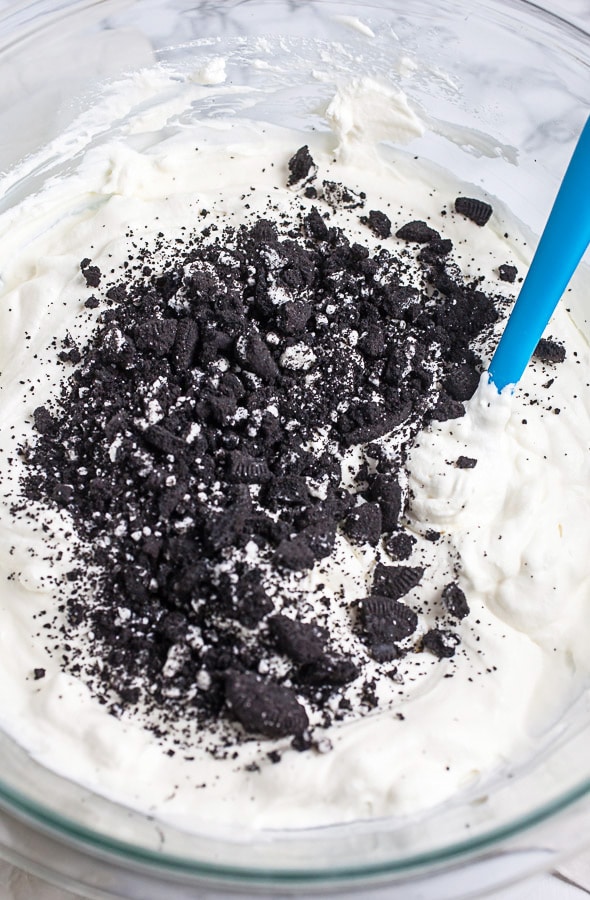
- Place as many cookies as you like in a heavy-duty freezer bag or some kind of plastic bag and smash them with a meat mallet, rolling pin, or any other kitchen tool that will crumble the cookies. Alternately, you can use a food processor to pulverize them but you don't get the added bonus of getting out your aggression.
- Pour the crushed cookies into the bowl and gently fold them into the cream mixture.
How Many Cookies Should I Add?
You can add as many or as few cookies as you like. Much of the sweetness in this ice cream comes from the creamy filling in the cookies so the more cookies you add the sweeter it will be.
I added 12 cookies to this recipe and found it to be quite sweet. If you like your ice cream on the sweeter side I'd say this is a good amount and if you like it less so I would opt for fewer cookies.
You can customize the texture to your liking as well. The cookies may be completely pulsed or you can leave some of them in larger chunks if you enjoy the texture.
I like a bit of chunky cookie texture so that's the route I went with this recipe.
Love cookies? Check out these recipes!
- Gluten Free Chocolate Cookies
- Chocolate Dipped Peppermint Cookies
- Crispy Sugar Cookies
- Peanut Butter Blossoms
How Long Does Ice Cream Take To Freeze?
Once the creamy mixture is combined it's time to freeze it so the whole thing can turn into ice cream.
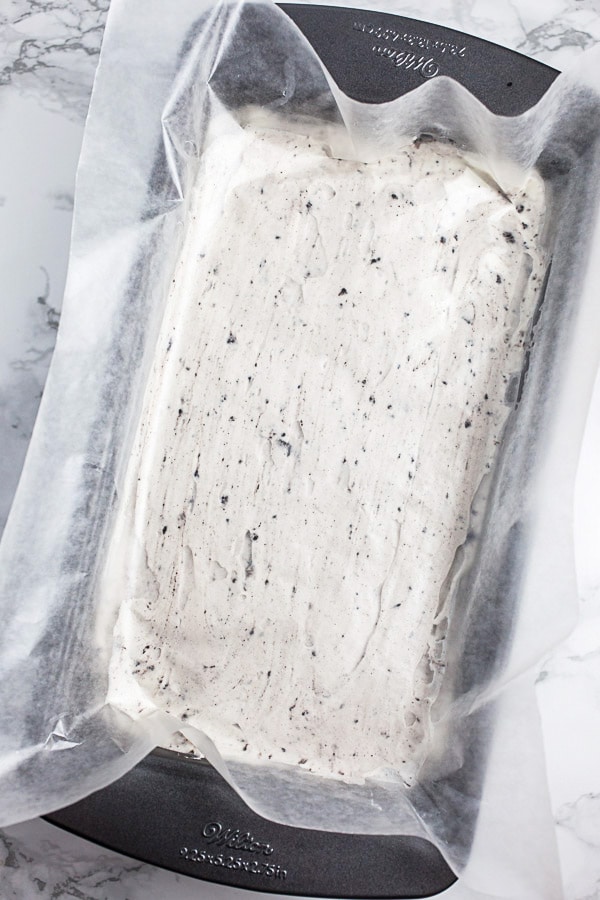
This is done by simply pouring the mixture into a bread pan. It's best to use a metal loaf pan as a glass one may shatter in the freezer and no one wants to deal with that!
- Pour the mixture into a metal loaf pan and smooth the top with a spatula.
- Cover the mixture with some wax paper, parchment paper, or plastic wrap.
- Place the pan in the freezer and allow at least 6 hours for it to freeze. You can also make it the night before and allow it to freeze overnight.
I normally use a metal loaf pan to make something like Coffee Banana Bread or Old Fashioned Rhubarb Bread but it works great for no churn ice cream as well!
How To Serve No Churn Ice Cream
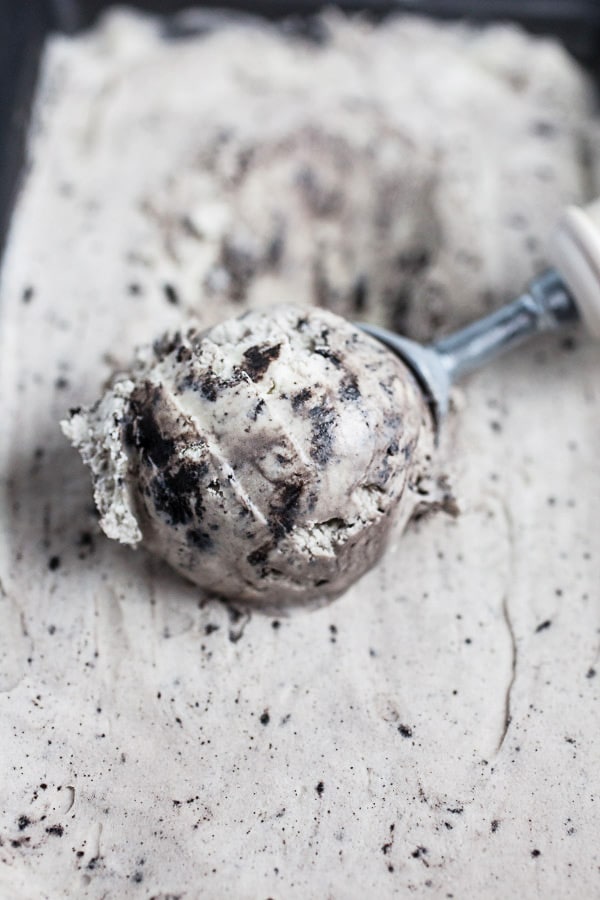
Once the mixture is frozen it's ready to serve.
Remove the pan from the freezer a few minutes before serving to soften it up a bit. Use an ice cream scoop or a large spoon to scoop up as much as you like.
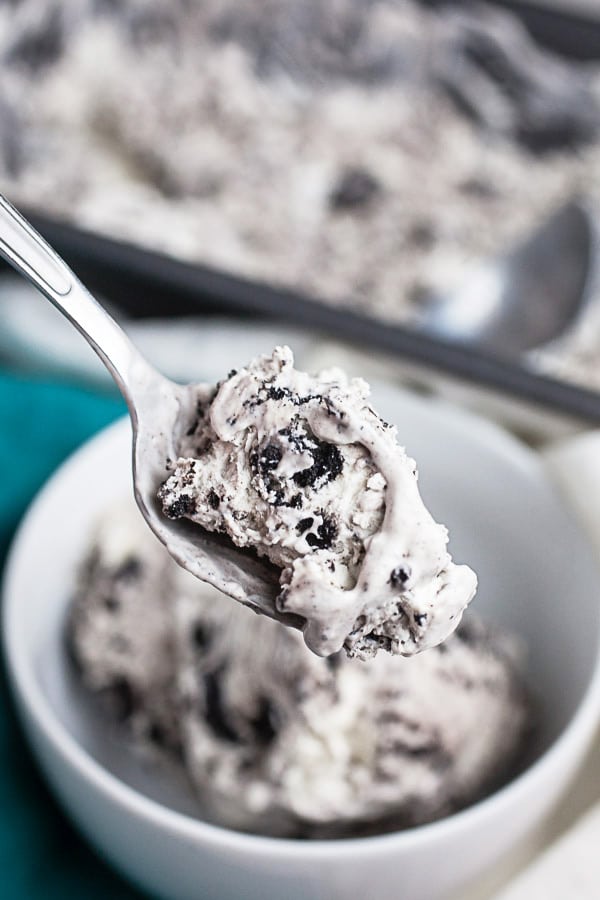
You can serve it with extra crushed cookies on top, some chocolate sauce, or simply as-is.
I recommend adding a pinch of salt to the top of the ice cream as this helps to balance the sweetness. This step is optional, though.
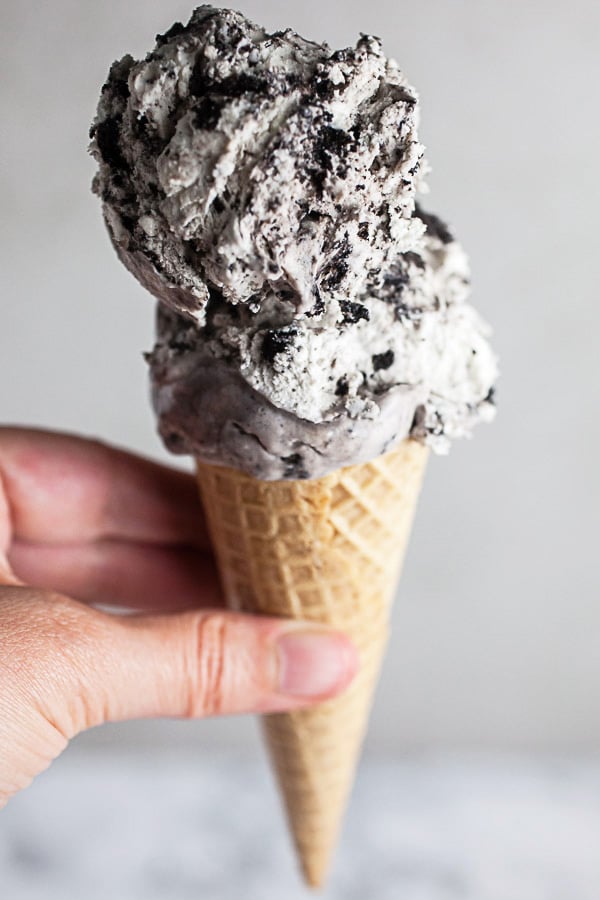
You can serve it in a bowl, in an ice cream cone, or straight out of the pan if you like.
Love chocolate? Don't miss these recipes!
- Bailey's and Chocolate Glazed Doughnuts
- Italian Chocolate Hazelnut Cake
- Toasted Coconut Chocolate Chip Cupcakes
- Gluten Free Puppy Chow
- Peppermint Chocolate Cheesecakes
How Long Will It Last In The Freezer?
This ice cream should last up to a month in the freezer.
It's important to cover it with plastic wrap and place a lid on top of the loaf pan in order to prevent ice crystals from forming and to keep it fresh.
But, let's be honest, I don't know in whose home ice cream lasts more than a few days?
Be sure to check out this No Churn Peanut Butter Cup Ice Cream!
Love sweet treats? Check out these recipes!
- Strawberry Mint Panna Cotta
- Pistachio Panna Cotta
- Pumpkin Panna Cotta
- Whiskey Bailey's Affogato
- Scandinavian Almond Cake
- Strawberry Mascarpone Tartlets
- Gluten Free Lemon Doughnuts
- Maple Walnut Baklava Bites
Looking For More No Churn Ice Cream Recipes? Don't Miss These!
Easy Homemade Pistachio Cardamom Ice Cream
London Fog No Churn Ice Cream
No Churn Strawberry Vanilla Ice Cream
Persian No Churn Saffron Ice Cream
No Churn Salted Butterscotch Ice Cream

Cookies and Cream Ice Cream (Gluten Free)
Ingredients
- 1 pint heavy whipping cream cold
- 1 14 oz. can sweetened condensed milk
- 1 package gluten free chocolate sandwich cookies or Oreos if not GF
- pinch kosher salt optional
- 1 package gluten free ice cream cones optional
Instructions
- Pour 1 pint (16 oz.) of COLD heavy whipping cream into the bowl of a Kitchen Aid stand mixer or into a regular large bowl if using a hand mixer. Using the whisk attachment of a Kitchen Aid stand mixer mix for 5-6 minutes on medium-high or until the whipping cream has formed stiff peaks. Alternately, do the same thing using a hand mixer.
- Pour 1 14 oz. can of sweetened condensed milk into a separate large bowl.
- Add 1 scoop of the whipped cream to the condensed milk and slowly stir to combine. Continue to add the whipped cream, 1 scoop at a time, folding each scoop in using a spatula. Continue until all the whipped cream is added. Be careful not to over-mix or the mixture will deflate.
- Place desired amount of chocolate sandwich cookies into a heavy-duty freezer bag or plastic bag and crush them using a rolling pin or meat mallet. Alternately, you can use a food processor.
- Place the crushed cookies in the bowl and carefully fold them into the mixture using a spatula.
- Pour the ice cream mixture into a metal bread pan or loaf pan. Smooth the top of the ice cream out with a spatula. Place a piece of wax paper or plastic wrap over the top of the bread pan. Press down on the wax paper, smoothing it out across the surface of the ice cream (this will prevent ice crystals from forming).
- Place the bread pan in the freezer and allow to harden for at least 6 hours or overnight if possible.
- To Serve: Remove the pan from the freezer a few minutes before serving. Scoop out desired amount and serve with a pinch of kosher salt to balance out the sweetness (optional).The ice cream may be served in a cone or on its own in a bowl.


Leave a Reply